Tags: Visual edit apiedit |
Tags: Visual edit apiedit |
||
| Line 2: | Line 2: | ||
== Adding a page == |
== Adding a page == |
||
| − | [[File:Tutorial1.jpeg|centre|thumb|220x220px]] |
+ | [[File:Tutorial1.jpeg|centre|thumb|220x220px|[https://vignette4.wikia.nocookie.net/scholastica/images/9/9d/Tutorial1.jpeg/revision/latest?cb=20170812165336 Full Size Image]]] |
| − | <span> </span>[https://vignette4.wikia.nocookie.net/scholastica/images/9/9d/Tutorial1.jpeg/revision/latest?cb=20170812165336 Full Size Image] |
||
| − | |||
Before you make a new page, make sure that one like it doesn't already exist. Also, don't use a page for something that would be better suited for a blog. We don't need a lot of extra pages cluttering up the Scolastica Wikia, so please only make well thought through ones. |
Before you make a new page, make sure that one like it doesn't already exist. Also, don't use a page for something that would be better suited for a blog. We don't need a lot of extra pages cluttering up the Scolastica Wikia, so please only make well thought through ones. |
||
== Adding an image == |
== Adding an image == |
||
| − | [[File:Tutorial2.jpeg|centre|thumb|220x220px]] |
+ | [[File:Tutorial2.jpeg|centre|thumb|220x220px|[https://vignette1.wikia.nocookie.net/scholastica/images/5/55/Tutorial2.jpeg/revision/latest?cb=20170812165553 Full Sized Image]]] |
| ⚫ | |||
| − | <span> </span>[https://vignette4.wikia.nocookie.net/scholastica/images/9/9d/Tutorial1.jpeg/revision/latest?cb=20170812165336 Full Size Image] |
||
| − | |||
| ⚫ | |||
== Adding an infobox == |
== Adding an infobox == |
||
Revision as of 13:19, 14 August 2017
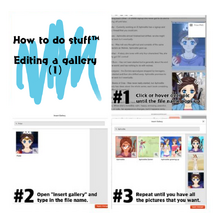
Correctly titled "How to do stuff", the below nine images are intended to give you a crash course for the Scolastica Wikia. If the text is too small to read, click to the full picture link below the picture. If extra stuff needed to be said, that can also be found below the picture. Hopefully, this was helpful, but if you have any other questions, just ask a member on here, or make a blogpost.
Adding a page

Before you make a new page, make sure that one like it doesn't already exist. Also, don't use a page for something that would be better suited for a blog. We don't need a lot of extra pages cluttering up the Scolastica Wikia, so please only make well thought through ones.
Adding an image

On the second page of the image editing mode, you can change the position to left, center, or right. (See below) Using the size text boxes on the same page, you can toggle the proportions. The text box and options for the caption is on the first page.
Adding an infobox

The offical infobox is called "The (Actual) Offical User Infobox". It's near the bottom of the list.
Adding a header


Linking pages/external links


It might be a little hard to see from the example, but this link works and this one does not. A working external link will be the correct red, and have a blue and white arrow on the right, as is seen here.
Adding/removing categories


If the text in the category bubble is red (as can be seen in Step 3), the category still does work, it just doesn't have a description on the page.


